使用tensorflow的Object Detection API做物体识别
学校有一个实验要做柑橘识别,因此想要用 tensorflow 用自己的训练集训练出一个只识别柑橘的模型出来,故有下文,别的物体识别也可以使用这种方式自己找数据去训练
环境准备
- Win10
- 一张优秀的显卡(尤其显存要大,最低要求 2G)
- Anaconda
- tensorflow 1.5
- python 3.5
- CUDA 9.0.167 (目前官网的文档可能还是8.0,但亲测 import 寻找的是 9.0 的 dll 文件)
- cuDNN 7.0.5
- protoc 3.5.1
环境的配置刚开始是比较顺利的,安装了 Anaconda 的话,按照官网的说明可以专门创建一个名为 tensorflow 的 py 环境出来专门用于训练,这也是笔者所推崇的,安装完 tensorflow GPU 的版本,接着就把 CUDA 和 cuDNN 也装了,CUDA 安装目录下的 bin 和 libnvvp 目录都要添加进系统环境变量中, cuDNN 中的 cuda 目录建议解压放置到系统盘根目录并把其下的 bin 目录也添加进环境变量中
为了使用 Object Detection 包,我们必须把 proto 文件手动编译成 python 脚本,将 tensorflow/models 整个下载下来,编译用到的工具为 protoc,下载对应系统的压缩包,解压到系统盘,把其下的 bin 目录添加进环境变量,编译的步骤跟随 安装文档, win 下记得把 models 目录和 models/slim 目录都添加进环境变量中,编译成功后运行测试脚本确保 Object Detection 可用,至此 Object Detection 相关的包就处于可用的状态了
注意:如果还是提示找不到对应模块的话,需要在 对应环境的 site-packages 目录下加入一个 tensorflow_model.pth 文件,内容如下
第一行是 research 的路径
第二行是 slim 的路径
制作训练集
- 爬取柑橘的相关图片(其他物体类似)
此步略,自己爬可以,在百度图片搜索结果页右键另存为网页也可以,获取数据不是本文讨论的重点
- 手动裁剪图片
一方面减小体积,另一方面尽量显示出特征主体,注意主体也不能过大,最好留有一部分背景,没有进行严格的验证
- 给图片打 Label
win 环境下可以使用 labelimg 给图片的局部加上分类标签来制作我们的数据集,如果是用 mac 的话可以尝试一款名为 rectlabel 的付费 app ,能对图片的分类特征进行更精细的框选,效果应该更好,支持输出 PASCAL VOC 格式的图片标记
生成 TFRecord 文件
我们的图片和 labelimg 生成的分类注解 xml 文件应该按如下方式放置
Project
.
├── annotations
│   ├── xmls
│   │   ├── tangerine_1.xml
│   │   └── tangerine_2.xml
│   └── trainval.txt
│
├── images
│   └── tangerine_1.jpg
│   └── tangerine_2.jpg
├── data
│   └── tangerine_label_map.pbtxt
因为本文使用 labelimg 进行的图片特征标记已经符合 Oxford pet dataset 的格式,所以笔者直接使用的是 models 目录中自带的 转换脚本 来将我们自己制作的数据集转换成文档所要求的 TFRecord 文件,将输出的文件名称分别改为 tangerine_train.record 和 tangerine_val.record,运行转换脚本, 参数 data_dir 也就是上图目录树中 Project 的目录,output_dir 是输出目录, label_map_path 也就是我们 tangerine_label_map.pbtxt 的文件路径,脚本默认是使用 30% 的图片数据作为测试集,可根据自身情况进行修改
留意目录树的童鞋可能会发现,annotations 目录下还有一个 trainval.txt 文件,因为 object detection 需要读取其中的每一行来去读取相应的 xml 文件,然后根据 xml 中的 filename 和 path 标签内容再去读取相应的 jpg 图片。因此,我们需要把所有的 xml 文件名称(不含扩展名)以一个文件一行的形式,写入 trainval.txt 并保证它放在目录树所示位置,每个 xml 文件中的 filename 标签内容也必须修改为带扩展名的形式,这里我自行编写了一些脚本专门用于批量进行自动修改
使用说明:
- clean_data.py 用于将同一个目录下的图片和xml文件重命名成规整的名字
- gen_trainval.py 用于生成
trainval.txt文件 - xml_modify.py 用于修改 xml 文件的部分内容使得
create_tangerine_tf_record.py能够顺利通过里面提供的标识找到图片并生成 TFRecord
使用详情请阅读代码注释
选择模型及修改对应配置文件
本文使用的模型为 coco数据集的 faster_rcnn_resnet101 模型,想要使用预训练的模型我们需要将模型的压缩包下载下来,将里面前缀为 model.ckpt 的文件解压到我们的 Project/training 目录下, faster_rcnn_resnet101_coco.config 是对应的模型文件,在里面把对应的 PATH_TO_BE_CONFIGURED 的部分自行进行修改,训练的时候 tensorflow 会通过读取配置文件的形式去读取对应的模型文件,训练集测试集和 label ,如果需要修改训练步数减少训练时间可以修改 num_steps
模型训练及效果查看
训练命令
# 在 research 目录下
$ python object_detection/train.py --logtostderr --pipeline_config_path=E:/DL/tangerine-recognition/faster_rcnn_resnet101_coco.config --train_dir=E:/DL/tangerine-recognition/training
开启 tensorboard 看训练时损失函数的变化情况
$ tensorboard --logdir=E:/DL/tangerine-recognition/training --port=6006 --host=localhost
# 访问 localhost:6006
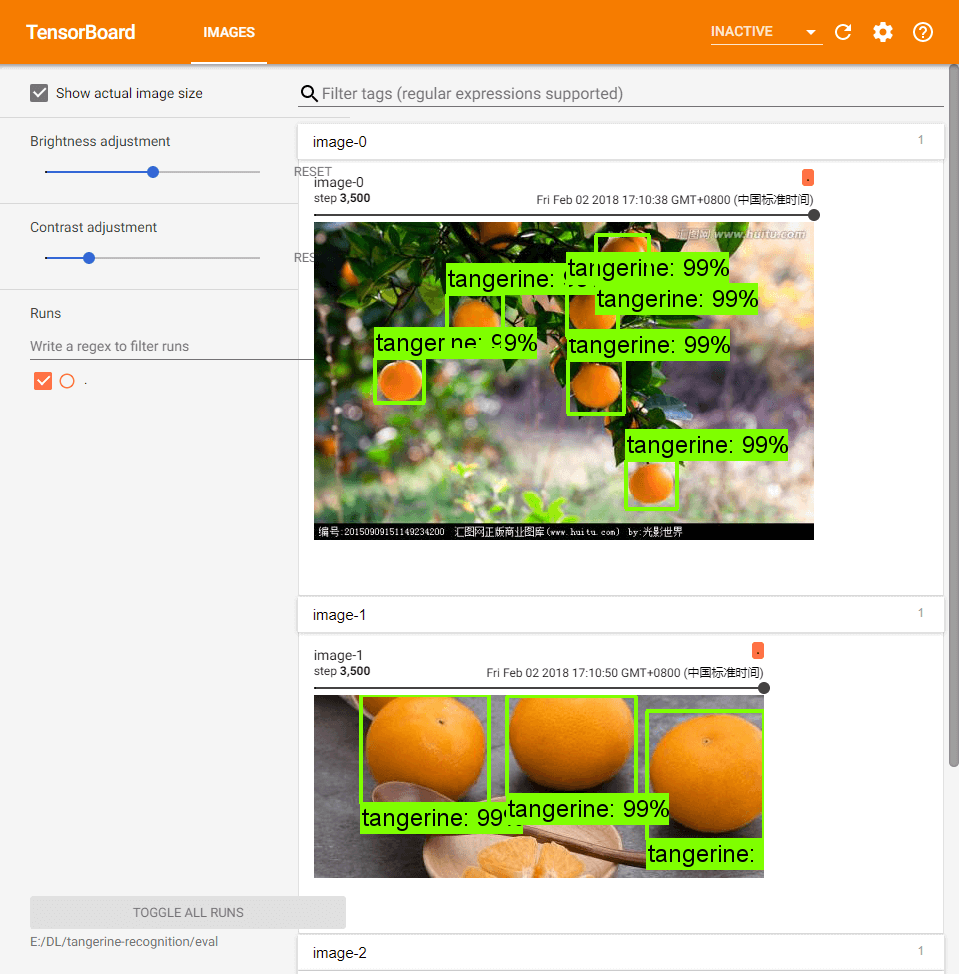
开启 tensorboard 看模型在测试集上的效果
# 在 research 目录下
$ python object_detection/eval.py --logtostderr --pipeline_config_path=E:/DL/tangerine-recognition/faster_rcnn_resnet101_coco.config --eval_dir=E:/DL/tangerine-recognition/eval --checkpoint_dir=E:/DL/tangerine-recognition/training

$ tensorboard --logdir=E:/DL/tangerine-recognition/eval --port=6006 --host=localhost

# 访问 localhost:6006,右上角选择 image

导出训练好的模型
# 在 research 目录下
$ python object_detection/export_inference_graph.py --input_type image_tensor --pipeline_config_path E:/DL/tangerine-recognition/faster_rcnn_resnet101_coco.config --trained_checkpoint_prefix E:/DL/tangerine-recognition/training/model.ckpt-{设置的步数} --output_directory E:/DL/tangerine-recognition/training/result
在 result 目录下就能看到我们的 frozen_inference_graph.pb 可用于生产部署的图模型了
使用 python 调用已训练的模型进行识别
# demo.py
import cv2
import numpy as np
import tensorflow as tf
from object_detection.utils import label_map_util
from object_detection.utils import visualization_utils as vis_util


class TOD(object):
    def __init__(self):
        self.PATH_TO_CKPT = 'E:\\DL\\tangerine-recognition\\training\\result\\frozen_inference_graph.pb'
        self.PATH_TO_LABELS = 'E:\\DL\\tangerine-recognition\\tangerine_label_map.pbtxt'
        self.NUM_CLASSES = 1
        self.detection_graph = self._load_model()
        self.category_index = self._load_label_map()

    def _load_model(self):
        detection_graph = tf.Graph()
        with detection_graph.as_default():
            od_graph_def = tf.GraphDef()
            with tf.gfile.GFile(self.PATH_TO_CKPT, 'rb') as fid:
                serialized_graph = fid.read()
                od_graph_def.ParseFromString(serialized_graph)
                tf.import_graph_def(od_graph_def, name='')
        return detection_graph

    def _load_label_map(self):
        label_map = label_map_util.load_labelmap(self.PATH_TO_LABELS)
        categories = label_map_util.convert_label_map_to_categories(label_map,
                                                                    max_num_classes=self.NUM_CLASSES,
                                                                    use_display_name=True)
        category_index = label_map_util.create_category_index(categories)
        return category_index

    def detect(self, image):
        with self.detection_graph.as_default():
            with tf.Session(graph=self.detection_graph) as sess:
                # Expand dimensions since the model expects images to have shape: [1, None, None, 3]
                image_np_expanded = np.expand_dims(image, axis=0)
                image_tensor = self.detection_graph.get_tensor_by_name('image_tensor:0')
                boxes = self.detection_graph.get_tensor_by_name('detection_boxes:0')
                scores = self.detection_graph.get_tensor_by_name('detection_scores:0')
                classes = self.detection_graph.get_tensor_by_name('detection_classes:0')
                num_detections = self.detection_graph.get_tensor_by_name('num_detections:0')
                # Actual detection.
                (boxes, scores, classes, num_detections) = sess.run(
                    [boxes, scores, classes, num_detections],
                    feed_dict={image_tensor: image_np_expanded})
                # Visualization of the results of a detection.
                vis_util.visualize_boxes_and_labels_on_image_array(
                    image,
                    np.squeeze(boxes),
                    np.squeeze(classes).astype(np.int32),
                    np.squeeze(scores),
                    self.category_index,
                    use_normalized_coordinates=True,
                    line_thickness=8)

        cv2.namedWindow("detection", cv2.WINDOW_NORMAL)
        cv2.imshow("detection", image)
        cv2.waitKey(0)

if __name__ == '__main__':
    image = cv2.imread('image.jpg')
    detecotr = TOD()
    detecotr.detect(image)
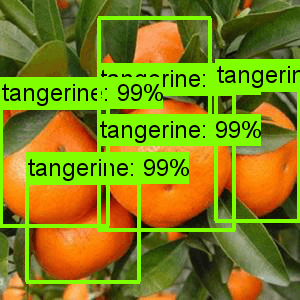
最终效果

参考资料
-
building-a-toy-detector-with-tensorflow-object-detection-api
-
how-to-train-your-own-object-detector-with-tensorflows-object-detector-api
-
Deep Dive into Object Detection with Open Images, using Tensorflow
商业转载请联系作者获得授权,非商业转载请注明出处,谢谢合作!
联系方式:tecker_[email protected]
